For this installation, we need the following prerequisites:
- A registered domain. “If you want to expose this service to the outside world”
- An A record on your online DNS service which is pointing to your server IP address. “If you want to expose this service to the outside world”
- Portainer, Docker, Docker Compose, and NPM on your cloud, virtual or bare metal Linux server “I am going to use Ubuntu here” If you want to know more about that you can go and watch that learning video first.
- Suppose you want to expose this service to the outside world, instead of using NPM as I told you in the previous section. In that case, you can also use other solutions like Cloudflare Tunnel or Teleport or other great solutions which you can find on my Youtube channel.
Now, let's start the installation procedures:
mkdir docker -p && mkdir docker/seafile -p && cd docker/seafilenano docker-compose.ymlNow, you can paste the below content to this YMl file:
version: '2.0'
services:
 db:
   image: mariadb:10.6
   container_name: seafile-mysql
   environment:
     - MYSQL_ROOT_PASSWORD=db_dev  # Requested, set the root's password of MySQL service.
     - MYSQL_LOG_CONSOLE=true
   volumes:
     - /root/docker/seafile/seafile-mysql/db:/var/lib/mysql  # Requested, specifies the path to MySQL data persistent store.
   networks:
     - seafile-net

 memcached:
   image: memcached:1.6.18
   container_name: seafile-memcached
   entrypoint: memcached -m 256
   networks:
     - seafile-net

 seafile:
   image: seafileltd/seafile-mc:latest
   container_name: seafile
   ports:
     - "6480:80"
#     - "443:443"  # If https is enabled, cancel the comment.
   volumes:
     - /root/docker/seafile/seafile-data:/shared   # Requested, specifies the path to Seafile data persistent store.
   environment:
     - DB_HOST=db
     - DB_ROOT_PASSWD=db_dev  # Requested, the value shuold be root's password of MySQL service.
     - TIME_ZONE=America/Toronto  # Optional, default is UTC. Should be uncomment and set to your local time zone.
     - [email protected] # Specifies Seafile admin user, default is '[email protected]'.
     - SEAFILE_ADMIN_PASSWORD=asecret     # Specifies Seafile admin password, default is 'asecret'.
     - SEAFILE_SERVER_LETSENCRYPT=false   # Whether to use https or not.
     - SEAFILE_SERVER_HOSTNAME=seafile.milootech.com # Specifies your host name if https is enabled.
   depends_on:
     - db
     - memcached
   networks:
     - seafile-net

networks:
seafile-net:Now save the file and exit, now you can start those needed containers via the below command:
docker compose up -dAfter that based on your configuration in the YML file, you will have your Seafile service and it will be accessible…
As you may see in the related video on my Youtube channel pls don't forget to change settings based on the exact link that you are using for this system as you can see the below screenshot also:
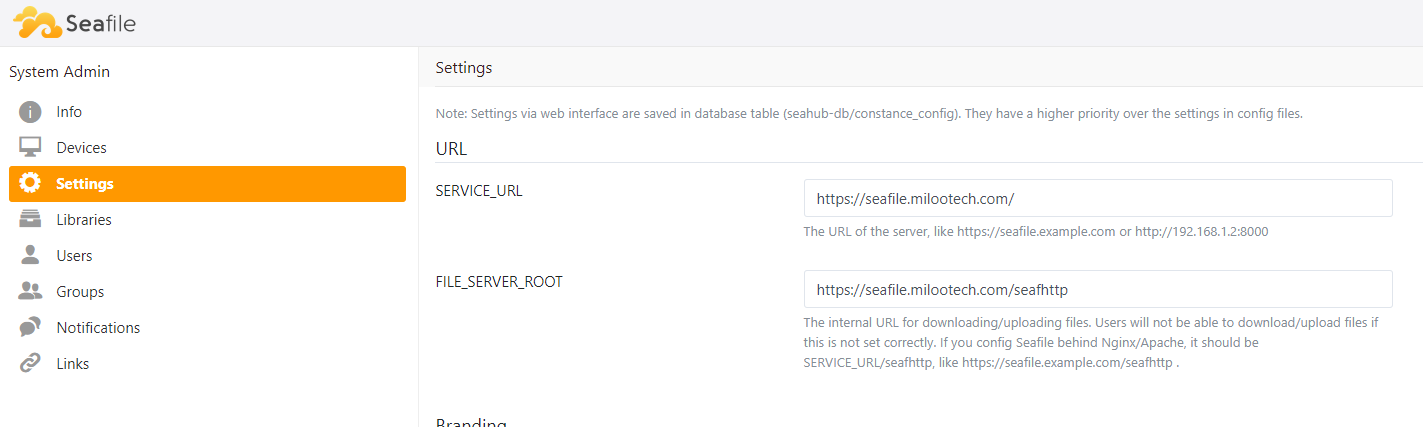
Now by fixing these two URLs you can upload and download your desired files without any problem.
Now, let's talk about the client applications for this amazing open-source product; for access to the download page of the client application pls click here.
Now, as you can see on the download page we have several choices 1- Desktop Syncing Clients and 2- Desktop Drive Clients 3- Mobile Clients 4- Outlook Add-on which you can choose based on your needs.
I hope it can help you and enjoy this fantastic tool…