KASM Installation: Simple Method
1) For docker and Nginx reverse proxy installation go to this link
2) Deploying Kasm Workspaces [Simple Method]:
Continue with the following commands in a terminal window also please check here to find the new installation commands if any just don't forget to add -L 8443 to bring up this services via port number 8443.
cd /tmp
curl -O https://kasm-static-content.s3.amazonaws.com/kasm_release_1.14.0.7f3582.tar.gz
tar -xf kasm_release_1.14.0.7f3582.tar.gz
sudo bash kasm_release/install.sh -L 8443Take note of the credentials displayed in the output
Open a web browser and navigate to https://DNSorIP:8443
Log in using username [email protected] and the password found in the installation output
You should see something like the below credentials when the setup has been finished, please after the first login change the admin's username and password.
Kasm UI Login Credentials

------------------------------------
  username: [email protected]
  password: BHlYTtfm1Hl2t
------------------------------------
  username: [email protected]
  password: FRijhR8mLXRZ0
------------------------------------

Kasm Database Credentials
------------------------------------
  username: kasmapp
  password: 9cWKT8rER1YNCW348VG6
------------------------------------

Kasm Redis Credentials
------------------------------------
  password: C90WrMiTTxWsf8uxueIj
------------------------------------

Kasm Manager Token
------------------------------------
  password: x03ozAOnbrethnnK0WTm
------------------------------------

Kasm Guac Token
------------------------------------
  password: wWX6jnRjelNwmdckcFAM68
------------------------------------

Service Registration Token
------------------------------------
  password: txVCEgQTU9cAmNPmiwoB
------------------------------------Note 1: By default, after the RAW installation Kali Linux is not enabled, and if you want to enable that or any other workspaces which are not enabled you can go to the admin section when you already logged in via the admin account and under the Workspaces menu you should find for example Kali Linux > click on three dots > edit > and check the check box called enabled and submit, after that, you should wait for that system download the related container image of that workspaces.
If after that by clicking and executing that workspace you will see just a black and blank screen you can go to the settings of that as I described above and add the below code into the Docker Run Config Override (JSON) field:
{
 "security_opt": [
   "seccomp=unconfined"
 ]
}Note 2: If you want to have a persistent profile login into the admin panel, go to the Groups section, and by clicking on a tree of dots of your desired Group that is assigned to the target user, click View on that page go to a group setting and add the allow_persistent_profile option select the value as true and click update.
Now we should add the below path in the persistent profile path field by going to the Workspaces section from the left menu clicking on the tree of dots of your desired app that you want to support this feature on and clicking edit:
/mnt/nfs_kasm_share/persistent_profiles/kasm_chrome/{username}Note 3: Two Factor Authentication requires the user to provide an additional piece of evidence beyond their standard password, to gain access to the system. Kasm implements a Time-based One-Time Password (TOTP) algorithm that can be used with popular apps such as Google’s Authenticator. Physical tokens can also be used.
Two-factor authentication can be enabled by the administrator through group settings. Each user will be required to set up their own secret and authentication application during their next login.
Navigate to the Groups tab in the Administrators Sidebar and select the green view button for the group > Select Add Settings from the Group Settings card > Select the “enable_totp_two_factor” setting and select True to add to all the users in the group.
Now by logout and re-login, you will see the QR code, and you can use the Authenticator app to finish the job.
Note 4: Since we are going to use the free edition of this amazing product, I won't describe how you can connect to the window's active directory via LDAP and if you have any questions regarding that part, you can ask me via the comment section of this video on Youtube or via Millotech social media.
But, in this case, I am going to describe how you can connect to your Windows machine which is working as a workgroup machine “standalone” on your LAN or via the WAN in fully compatible mode with your KASM server:
Supported Windows OSs are Windows Server 2019, 2022, and 10 and 11
Download and install KASM windows installer on your target Windows machine. “It is safe so if Windows doesn't like that click more info and click on run anyway”
Open the Windows PowerShell and use the below commands:
Add-WindowsCapability -Online -Name OpenSSH.Client~~~~0.0.1.0Add-WindowsCapability -Online -Name OpenSSH.Server~~~~0.0.1.0Start-Service sshdSet-Service -Name sshd -StartupType 'Automatic'Now make sure that port twenty-two “22” is allowed from your Windows firewall.
Now, please connect to your Linux host of KASM installation via SSH and run the below command:
openssl req -x509 -newkey rsa:4096 -keyout key.pem -out cert.pem -sha256 -days 365 -nodesDoing that will create cert.pem and key.pem which we should transfer to the Windows matching by using SCP via the below commands:
If the system asked you for the fingerprint just type yes and enter and by putting your password of that Windows user SCP will copy the file in the C drive of that Windows machine.
scp cert.pem [email protected]:/c:/scp key.pem [email protected]:/c:/Now go back to Windows and move those files from C drive into the c:\program files\kasm\certs folder.
Now you need to create another PEM file called jwt.pem for doing that go to Kasm web console > admin section > settings > and copy the API PUBLIC CERT field content > go to windows machine > go to c:\program files\kasm\certs > create new text file and paste that code > change the extension of that file to pem.
Now go to c:\program files\kasm > and open the config.yaml file by notepad > copy and paste the below text into that and save.
# server HTTP(s) configuration
ssl: true
port: 4902
server_private_key: "C:\\Program Files\\Kasm\\certs\\key.pem"
server_public_key: "C:\\Program Files\\Kasm\\certs\\cert.pem"

# path to JWT's RSA certificate for token verification
jwt_public_key: "C:\\Program Files\\Kasm\\certs\\jwt.pem"

# path to upload/download folders
upload_dir: "C:\\Program Files\\Kasm\\Upload"
download_dir: "C:\\Program Files\\Kasm\\Download"

# (optional) path to the log file
log_file: "C:\\Program Files\\Kasm\\log.txt"Now you should open the location of the downloaded Kasm Windows installer via cmd and run the below command:
kasm_windows_service_installer_x86_64_02beec.exe /config=config.yaml /jwt=jwt.pem /key=key.pem /cert=cert.pemNow you can go to Kasm Admin Console > compute > servers > and add your server with a private or public address same as the below screenshot:
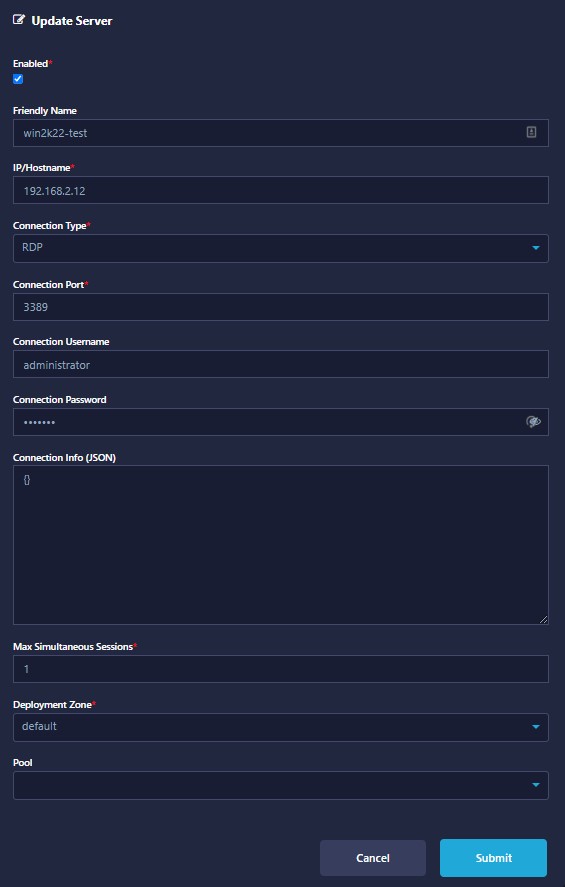
Now go to the Workspaces menu add new and create one same as the below example: "For the thumbnail URL you can use this URL"
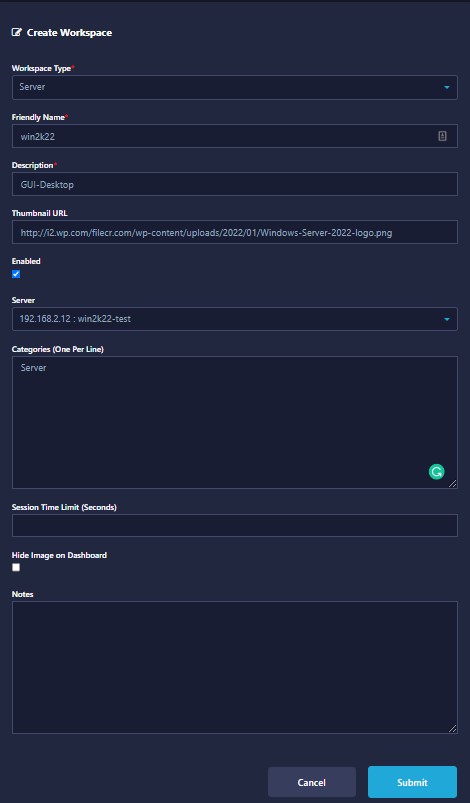
Congrats, now you can access your Windows machine from the workspaces.
Note 5: If you want to use the local Windows users as a single sign-on “not domain users in this case since we are using the free version of Kasm” just you need to create the same user account in local users with the same password or if you want to use Microsoft online accounts you need to change your related usernames with an exact email address and password in the Kasm server.
- Just don't forget to give remote desktop permission to that user.
After the user accounts creating you should go to the admin section of Kasm console > compute > servers > and update the server connection username and password by using the below data:
For the connection username field:
{sso_username}For the connection password field:
{sso_cred}Note 6: you can install the extensions needed by Chrome and Firefox browsers to achieve more security.
Note 7: in this latest version one thing happened and fortunately the system doesn't install all the workspaces automatically you can install based on your needs so if you have a server with less storage and other hardware resources you can freely install that, for adding any workspace you can use the KASM workspace registry which is accessible by default when you are logged in as an admin for the first time from the workspaces dashboard or you can access to that from https://serveraddress/#/registry.
Also, you can add other supported registries by clicking add new registry and putting the right registry link to that for example https://kasmregistry.linuxserver.io
Finally, click submit in the below form.